|
[Home] [Projects] |
![]()
Introduction to JavaScript
Content:
- What is JavaScript?
- Embedding JavaScript into a HTML-page
- Non-JavaScript browsers
- Event-Handling
- Functions
- Object hierarchy in the HTML-document
- Example of getting and setting object properties
- Working with Radiobuttons
- Links
- Exercises
![]()
- JavaScript is not Java!
- Running JavaScript in Browsers
![]()
Embedding JavaScript into a HTML-page
- Directly in the body of the HTML-page
<html>
<body>
<br>
This is a normal HTML document.
<br>
  <script language="JavaScript">
    document.write("This is JavaScript!")
  </script>
<br>
Back in HTML again.
</body>
</html>
This is a normal HTML document.
Back in HTML again.
- In the head of the HTML-page
<html> <head> <script language="JavaScript"> document.write("This is JavaScript!") </script> </head> <body> <br> This is a normal HTML document. </body> </html> - In a separate file
<html>
<head>
   <script language="JavaScript" src="MyJavaScriptFile.js">
   </script>
</head>
<body>
   This is a normal HTML document.
</body>
</html>
![]()
There is a way for hiding the source code from older browsers.
We will use the HTML-comments <!-- -->. Our new source code
looks like this:
<html>
<body>
<br>
This is a normal HTML document.
<br>
  <script language="JavaScript">
  <!-- hide from old browsers

    document.write("This is JavaScript!")

  // -->
  </script>
<br>
Back in HTML again.
</body>
</html>
![]()
Events and event handlers are very important for JavaScript programming.
Events are mostly
caused by user actions, for example, if the user clicks on a button a
Click-event occurs.
<form>
<input type="button" value="Test this example" onClick="alert('Yo')">
</form>
Other possible events are:
onBlur, onChange, onDblClick, onFocus, etc.
![]()
We will use functions in most of our JavaScript programs, so this is an important concept.
An example:
<html>
<head>
<script language="JavaScript">
<!-- hide

  function myFunction() {
    document.write("Welcome to my homepage!<br>");
    document.write("This is JavaScript!<br>");
  }

// -->
</script>
</head>
<body>
  myFunction();
  myFunction();
  myFunction();
</body>
</html>
Functions can also be used in combination with event-handlers. Please consider
this example:
<html>
<head>
<script language="JavaScript">
<!-- hide

function calculation() {
  var x = 12;
  var y = 5;
  var result = x + y;
  alert(result);
}

// -->
</script>
</head>
<body>

<form>
  <input type="button" value="Calculate" onClick="calculation()">
</form>

</body>
</html>
Here you can test this example:
![]()
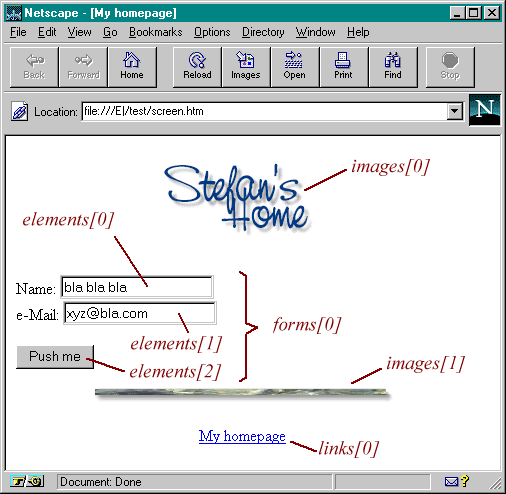
Object hierarchy in the HTML-document
JavaScript organizes all elements on a web-page in a hierarchy. Every
element is seen as an
object and can have certain properties and methods.
With the help of JavaScript you can easily manipulate the object properties
and call the object methods.
An example:
<html>
<head>
   <title>My homepage</title>
</head>

<body bgcolor=#ffffff>

<img src="home.gif" name="pic1" width=200 height=100>

<form name="myForm">
Name:
<input type="text" name="name" value="bla bla bla">
e-Mail:
<input type="text" name="email" value="xyz@bla.com">
<input type="button" value="Push me" name="myButton" onClick="alert('Yo')">
</form>

<img src="ruler.gif" name="pic4" width=300 height=15>

<a href="http://www.geometria.de">My homepage</a>

</body>
</html>
Here is a screenshot of this page (some things are added with red color):
The following image illustrates the hierachy created by our example HTML-page:
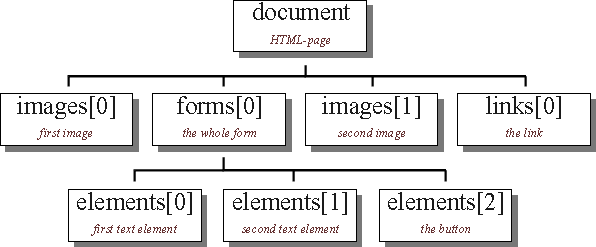
Getting information about the properties of objects.
The commands looks like:
var nameInput = document.forms[0].elements[0].value;
var imageHeight = document.images[1].height.value;
![]()
Example of getting and setting object properties
Look at the following example.
Source code:
<html>
<head> <script language="JavaScript">function calculate() { var a = document.MyForm.Textfield_a.value; var b = document.MyForm.Textfield_b.value; var result = eval(a) + eval(b); document.MyForm.Textfield_result.value = result; }
</script> </head> <body> <form name="MyForm" action="">
<p> <i>a</i> =
<input type="text" name="Textfield_a" size="4" maxlength="4" value="1">
</p>
<p> <i>b</i> =
<input type="text" name="Textfield_b" size="4" maxlength="4" value="1">
</p>
<p>
<input type="button" name="Button_calculate" value="Calculate"
onClick="calculate()">
</p>
<p> <i>a + b</i> =
<input type="text" name="Textfield_result" size="4" maxlength="4" value="?">
</p>
</form> </body> </html>
![]()
The following example shows, how to work with radiobuttons:
      <form name="formRB" action="">
<p><input type="radio" name="radiobutton" value="1"
    onClick="alert('Radiobutton 1 checked!')" checked>Radiobutton 1</p>

<p><input type="radio" name="radiobutton" value="2"
    onClick="alert('Radiobutton 2 checked!')">Radiobutton 2</p>

<p><input type="radio" name="radiobutton" value="3"
    onClick="alert('Radiobutton 3 checked!')">Radiobutton 3</p>

<p><input type="radio" name="radiobutton" value="4"
    onClick="alert('Radiobutton 4 checked!')">Radiobutton 4</p>
</form>
![]()
- Voodoo's Introduction to
JavaScript (local)
Most of the text and examples on this page are from this tutorial.
- Offical
Netscape JavaScript Reference
- Offical
Netscape Client Side JavaScript Reference 1.3
![]()
Exercise 1
Develop a HTML-document similar to the last example.
Change in the JavaScript-function
calculate() the line
var result = eval(a) + eval(b);
to
var result = a + b;What does happen?
Exercise 2
Develop a HTML-document similar to the last example. Add a list with four
radiobuttons
labeled with "+", "-", "/" and "*".
Depending on these radiobuttons the two numbers should be
calculated correctly.
Hint: Use the command: "if (...boolean expression ...)
{ ... some code ... } else { ... some code ... }"
Exercise 3
Only for users of Internet-Explorer:
The background colour of the input fields should be highlighted (perhaps
with yellow),
if someone changes the input value.
Hint: The corresponding events are onFocus and onBlur. The
property for the background colour could be changed with style.backgroundColor = "yellow".
Exercise 4
Develop a figure which visualizes the multiplication of two 2x2 matrizes
A and B.
The cells of A should be labeled with a11, a21,
a21, a22.
The cells of B should be labeled with b11, b21,
b21, b22.
A third matrix C = AB should be interactive in
the sense, that if you click into one of the cells of C, the term
for the calculation should be shown in a new given textfield.
Example: If you click in the cell c11 the
new textfield should contain the string
c11 = a11b11 + a12b21.
Hint: As a starting point you can use the geometric figure Matrix_Multiplication.
[Solution]
![]()